Friday tech tip: how to add page numbers in Microsoft Word
Friday tech tip: how to add page numbers in Microsoft Word
September 20, 2013
Adding page numbers to a Microsoft Word document sounds like it should be a simple task. But if you don't know how to do it, it's hard to work out how.
We've seen people adding numbers to pages individually or even writing them on after they've printed their document out. So, today we explain how to add automatic page numbers to a Microsoft Word document:
- Make sure the document is open in Microsoft Word.
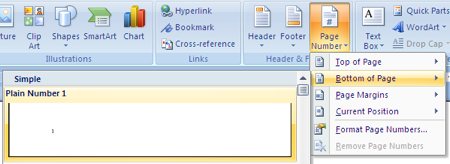
- Go to the Insert menu and choose Page Number
- A dropdown will open allowing you to select where to insert your page numbers. For this example, select Bottom of Page.
- You can then choose from a range of styles. We'll choose Plain Number 1, but you can select a different one if you prefer:

- Now you'll see that page numbers have been added to your document. They'll appear automatically on every page.
- You can change the font and formatting if you like. Just highlight the number and then choose your formatting options (font, size, etc) as with any other text.
- Once you're done with your page numbers, double-click outside the footer to edit the main part of your document again.
If you need to make further changes to your page numbers, just double-click any page number in the document.


Comments
Add a comment