IT for Donuts: how to wipe your computers for disposal
IT for Donuts: how to wipe your computers for disposal

IT for Donuts is our regular Friday feature where we explain a tech term or answer a question about business IT.
This week, see how to safely wipe sensitive data from your computer before you get rid of it.
Don't just delete data
Before you dispose of an old computer or server, it's vital to erase every trace of your data. Just ask the NHS, which was fined after computers containing patient data turned up on eBay in 2012.
Simply deleting the files isn't enough, because it's usually possible to reconstruct data from the imprint it leaves behind.
To get rid of data so it can't possibly be retrieved, you have three main options:
- Smash up your computer's hard drive. While this will do the job, disk drives can contain dangerous materials and pose a safety risk, so it's not recommended.
- Get a computer disposal company to do it. Make sure you pick a company with a good track record, so you can be confident the data is erased.
- Use a data wiping tool yourself. This is fairly straightforward and will give you confidence that data really has been wiped. Read on to learn how to do it.
Get a data scrubber
To remove data securely, you need to use data scrubbing software. This writes meaningless data over your files several times, until the original data can't be recovered.
If you just want to completely wipe your computer, there are a number of data scrubbers that will do the job. We like Darik's Boot and Nuke (DBAN). It should work with virtually all laptop and desktop PCs, as long as they have a CD drive.
Before you start
Before you erase your computer, there are a few things to bear in mind:
- Following the instructions on this page will erase everything from your computer, irretrievably. Back up anything you want to keep.
- Once you've run DBAN, you will need to reinstall your operating system if you want to keep using the computer. This takes time and can be fiddly.
- The process of erasing everything can take a while. Depending on the size of your disk drive(s), it can be anything from a couple of hours to a couple of days.
How to use DBAN
To follow these instructions, you'll need a blank CD and a computer running Windows 7 or 8. This can be a different computer to the one you're erasing.
- Download the DBAN software, but don't try to run the file (it won't work).
- Put a blank CD into your CD drive.
- Right-click the file you've downloaded and select Burn disc image.
- Wait while your computer copies the DBAN software to the CD.
- If the computer on which you created the CD is not the one you want to erase, put the CD into the computer you do want to erase.
- Turn on or restart the computer you want to erase.
- After a moment, the DBAN software should load. If you see your normal operating system, you need to find out how to make your computer boot from a CD. The instructions for this vary, so you may need to search online.
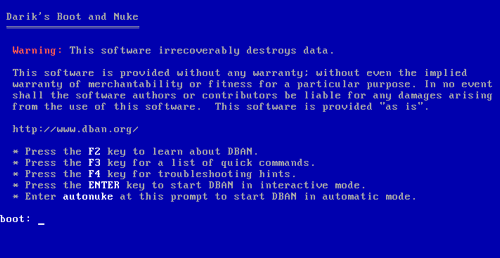
- Once you see the blue DBAN screen (see image above), pause for a moment. Are you ready to erase everything on this computer? Have you backed up all the data you need?
- If so, type autonuke and hit the Enter key.
- DBAN will begin scrubbing all disks in your computer. This can take anything from a few hours to over a day, so if you have a laptop, make sure it's plugged in!
Once DBAN has finished wiping your hard drive(s), you'll see a message to say DBAN succeeded. That's it — you can now dispose of the computer safely.
Scrubbing selected files
If you don't want to go as far as scrubbing your entire computer, you can use the free Eraser package to scrub selected files from a Windows PC. This is an excellent way to dispose of files securely while retaining a functioning computer.


Comments
Add a comment