IT for Donuts: how to sort data in Microsoft Excel
IT for Donuts: how to sort data in Microsoft Excel
IT for Donuts is our regular Friday feature where we explain a tech term or answer a question about business IT.
This week, we take a look at how to sort a list of anything in Excel.
Although these screenshots were taken on an Apple Mac, the options and settings should be the same if you use a Windows PC.
1. Tell Excel what to sort
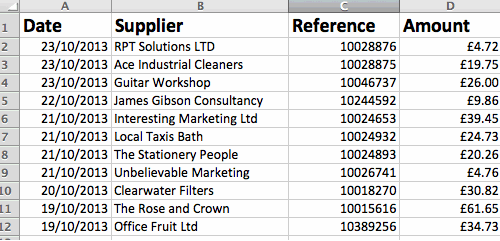
To get started, let's assume you have a spreadsheet open in Excel. It contains several columns full of information that you want to sort. It can be numbers, prices, words ... anything.
This example is just a small list of figures, but your data can have as many rows and columns as you want:

To get started, you need to tell Excel which items to sort. You can do this by clicking and dragging with the mouse to select the relevant figures.
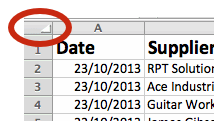
If you have a table like this, you probably want to sort the entire list by one of the columns. In that case, select the entire worksheet by clicking at the top left, in the gap between the row numbers and column letters:

2. Tell Excel how to sort
Once you've selected the data to be sorted, you need to set your sort criteria.
There are a few ways to do this, depending on what version of Excel you have.
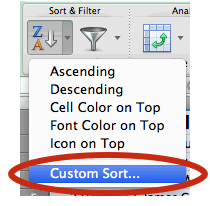
In recent versions, select the Data tab at the top of the screen. Then choose the down arrow next to the Sort icon:

This reveals a menu providing quick access to some common sort options. But we'll choose Custom Sort to give you full control:

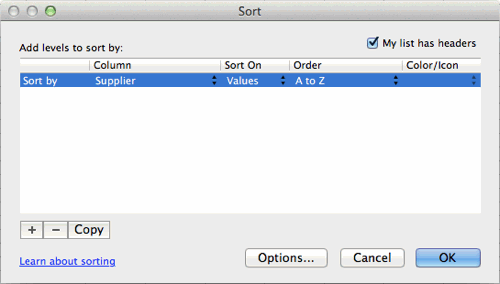
A dialog box will open showing all the options to sort your data.
First of all, if — like our example — your data has header fields (labels for the data in each column), select the My list has headers box.
Then you can choose what to sort by. In the dialog box, you can select:
- The column to sort. Selecting this will give you a list of your column headers.
- What to sort on. Usually you'd select values here, but you can also sort according to other criteria, like the colours of the cells in that column
- What order to sort by. The options here will change according to the data in the relevant column. For instance, it might be A to Z or Smallest to Largest.
In this example, we're going to sort the list by Supplier, from A to Z:

Once you've chosen your criteria, just hit OK to sort the data.
And that's it: you'll see the data you highlighted resorted by those criteria.


Comments
Add a comment