Friday tip: create an electronic signature on your Mac
Friday tip: create an electronic signature on your Mac
Has a client or business partner ever emailed you a PDF contract, asking you to print it, sign it, scan it and then send it back by email? Creating your electronic signature will save you all that hassle.
What's more, if you have an Apple Mac then you can pop your signature on the bottom of a PDF without requiring any special software. This tip should work on any Mac as long as it has a webcam (all recent MacBook laptops have webcams built in).
Here's how to create your electronic signature and sign your first document:
1. First, get a blank piece of paper and sign it. You'll need this later.
2. On your Mac, open Preview. It's the icon that looks like a couple of photographs:
3. Click the Preview menu, then choose Preferences.
4. In the window that opens, click Signatures.
5. Click the Create Signature button.
6. A window will open and your computer's webcam will turn on.
7. Hold the paper up to your webcam. You'll see your digital signature appear on screen:

8. Once you've positioned it so you're happy, click Accept. Your signature is now saved.
9. Close the window by clicking the red button at the top left.
10. Next, open the PDF to which you wish to add your signature (go to File > Open and select the file).
11. Click the pen icon to show the annotations toolbar:
![]()
12. Click the 'S' signature icon, then choose your signature from the dropdown:

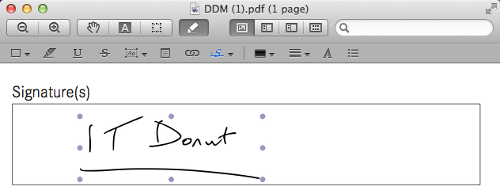
13. Click and hold the mouse where you want to add your signature. You can set the size of your signature by dragging while you hold the mouse button.
14. You can click and drag the signature to resize and reposition if required:

15. Once you're happy, click File, then Export. Enter a file name and click Save.
That's it - you've saved a copy of the PDF with your signature. And your signature will be saved in Preview so you can use it next time you need to sign a document too.


Comments
Add a comment